Erase The Trace - Spotting And Repairing Water Stains On Walls

About This


Do you find yourself in search of resources concerning Water Stains on Walls?


Water Stains on Walls
Water stains on wall surfaces are not pleasant to the eyes. Your home needs to lack stains on the walls, roofing, or floorings. That is the excellent state of a residence and its frameworks. Yet, sometimes it seems practically inescapable to experience water spots on walls in residences.
Property owners living in humid regions continuously handle the concern of water spots on wall surfaces. That doesn't have to be the situation for you. With well-rounded and accurate info on the causes of water discolorations as well as timely repair work processes, you will certainly constantly be a step ahead of such events. So, this write-up guarantees to be an useful overview for you.


3 Typical Sources Of Water Discolorations on Walls


Unlike popular belief, water discolorations on walls do not constantly originate from bad structure materials. There are a number of causes of water spots on wall surfaces. These include:


Poor Water drainage


This will certainly prevent water from seeping into the wall surfaces. This web links to excessive dampness that you observe on the wall surfaces of your building.
So, the leading root cause of wet wall surfaces, in this instance, can be a poor drain system. It can additionally be due to bad administration of sewer pipelines that go through the structure.


Damp


When warm wet air meets with completely dry cool air, it causes water droplets to base on the wall surfaces of structures. This occurs in kitchens and bathrooms when there is vapor from food preparation or showers. The water beads can tarnish the surrounding walls in these parts of your house as well as infect various other areas.
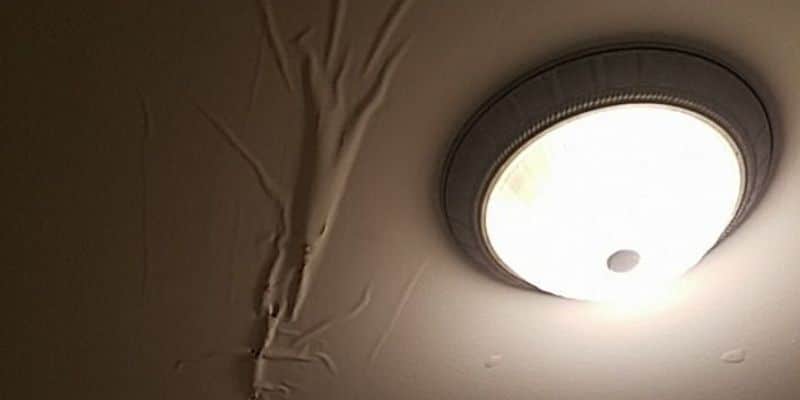
Damp or condensation impacts the roofing and also wall surfaces of buildings. This causes them to appear darker than various other locations of the residence. When the wall surface is wet, it creates a suitable atmosphere for the growth of microorganisms and also fungis. These may have unfavorable impacts on health and wellness, such as allergic reactions and also respiratory system conditions.


Pipe Leaks


The majority of residences have a network of water pipelines within the wall surfaces. It constantly boosts the feasibility of such pipelines, as there is little oxygen within the walls.
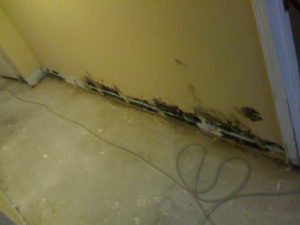
A downside to this is that water leak impacts the walls of the building and creates prevalent damages. An indicator of defective pipes is the look of a water tarnish on the wall surface.


Water Spots on Wall: Fixing Tips


When dealing with water discolorations, house owners would typically want a fast fix. They would quickly recognize this is counterproductive as the water spots recur. Below are a few handy tips that will lead you in the repair work of water discolorations on walls:


  • Constantly repair the root cause of water stains on walls

  • Involve the help of specialist repair solutions

  • Practice routine hygiene and clean clogged sewer system

  • When constructing a home in a waterlogged location, ensure that the workers perform appropriate grading

  • Tiling areas that are prone to high condensation, such as the bathroom and kitchen, helps in lowering the build-up of wet

  • Dehumidifiers are also practical in keeping the dampness levels at bay

  •  

Pro Tip


A houseplant in your house also boosts its moisture. If the house is currently moist, you may want to introduce houseplants with marginal transpiration. An example of appropriate houseplants is succulents.


Conclusion


Although nobody intends to have water stains on walls in their house, it can take place to the best of us. This post gives you take advantage of, as you currently recognize how to manage this problem if it does occur.
It is always best to hire specialist services to assist take care of the problems in your house.
Sometimes it seems nearly unpreventable to experience water stains on walls in houses.
In contrast to preferred belief, water spots on wall surfaces do not constantly stem from inadequate building materials. There are a number of causes of water spots on wall surfaces. The water beads can stain the surrounding walls in these parts of your house and also spread to various other locations.
Here are a few useful ideas that will certainly lead you in the fixing of water stains on wall surfaces:


How to Remove Water Stains From Your Walls Without Repainting


The easy way to get water stains off walls


Water stains aren’t going to appear on tile; they need a more absorbent surface, which is why they show up on bare walls. Since your walls are probably painted, this presents a problem: How can you wash a wall without damaging it and risk needing to repait the entire room?


According to Igloo Surfaces, you should start gently and only increase the intensity of your cleaning methods if basic remedies don’t get the job done. Start with a simple solution of dish soap and warm water, at a ratio of about one to two. Use a cloth dipped in the mixture to apply the soapy water to your stain. Gently rub it in from the top down, then rinse with plain water and dry thoroughly with a hair dryer on a cool setting.


If that doesn’t work, fill a spray bottle with a mixture of vinegar, lemon juice, and baking soda. Shake it up and spray it on the stain. Leave it for about an hour, then use a damp cloth to rub it away. You may have to repeat this process a few times to get the stain all the way out, so do this when you have time for multiple hour-long soaking intervals.


How to get water stains out of wood


Maybe you have wood paneling or cabinets that are looking grody from water stains too, whether in your kitchen or bathroom. Per Better Homes and Gardens, you have a few options for removing water marks on your wooden surfaces.

 
  • You can let mayonnaise sit on your stain overnight, then wipe it away in the morning and polish your wood afterward.


  •  
  • You can also mix equal parts vinegar and olive oil and apply to the stain with a cloth, wiping in the direction of the grain until the stain disappears. Afterward, wipe the surface down with a clean, dry cloth.


  •  
  • Try placing an iron on a low heat setting over a cloth on top of the stain. Press it down for a few seconds and remove it to see if the stain is letting up, then try again until you’re satisfied. (Be advised that this works best for still-damp stains.)

  •  

https://lifehacker.com/how-to-remove-water-stains-from-your-walls-without-repa-1849742925


How to Find and Repair Water Leaking in the Wall


I hope you enjoyed our post on Water Stains on Walls. Thanks so much for taking a few minutes to read our posting. Kindly take the opportunity to promote this write-up if you liked it. Thanks a lot for going through it.


Give Me A Quote!


Starting Your It Drainage System Installation

Click Here


The content listed below involving How to Install a Shower Drain is totally enjoyable. Read it yourself and see what you think about it.


How to Install a Shower Drain in a Basement
Upgrading a bathroom is one of the much more popular residence renovation jobs. Handling the plumbing for draining your shower can be exceptionally basic unless you overdo it.


Handling Your Own Shower Drainpipe Setup Task


Whether you are a tub or shower person, most individuals seek shower only options when getting a home. This basic fact indicates more than a few home owners spend a weekend break updating or setting up showers in their washrooms. Thankfully for you, it is a relatively straightforward process.

An enthusiast or pan refers to the horizontal surface area situated at the end of the shower. The enthusiast generally includes a non-slip surface area slightly banked towards the center or anywhere the drainpipe is located. Combined with 3 to 4 inch walls around the side, the goal of your shower water drainage plumbing is to obtain the water to move to as well as down the drain.

You can literally construct an enthusiast for your new shower, however you truly require to think about it. Do you really wish to get into the problems of obtaining the sloping proper, as well as making sure every facet of it is water resistant? And I suggest every element! It is much easier to simply get a pre-cast collector online or at your regional Lowes, Residence Depot or equipment store. Building one could sound like an excellent suggestion, but you will most likely feel in a different way after a couple of hrs.

No matter just how you set about getting a pan, you should strive to make use of one that has the drain located in the same area as the original pan. Relocating the drainpipe pipes can be a job, especially if the contractor utilized an unique framework structure. If you are established to move the drainpipe, you are going to have to cut down the pipeline or extend it, which might mean ripping up big portions of the flooring. Rephrase, you are mosting likely to be checking out a several weekend job.

Presuming we have our drain aligned, the actual attach is fairly simple. The water drainage pipe should be encountering upright approximately the collector. It will often resemble a "U", which means it acts as a cleanout to maintain nasty scents from returning up from the drainpipe. To connect the drainpipe, you are going to produce a water limited connection between a drainpipe cap on the top of the frying pan and the drain pipeline. Solutions differ, yet you are commonly going to do this by putting a combining piece on the top of the drainage pipe. This is after that covered with gaskets and also actually screwed right into the drain cap. The drainpipe cap must serve as a locknut, to wit, it screws straight onto the combining.

The challenging part of this process is getting your drainpipe cap to fit into a leak-proof placement in the frying pan. This is achieved by withdrawing the drainpipe cap when you make sure everything meshes. Then, you placed plumbing professionals putty around the bottom of the cap and after that screw it back on. The putty should create a limited seal between the cap and the shower pan, which maintains water from dripping under it and right into the framing under the shower.

Clearly, restroom showers been available in a wide range of designs nowadays. If you purchase an enthusiast, they usually come with plumbing guidelines or the store can keep in mind anything unusual you should know. It appears intricate, however is commonly pretty straight forward. Have a good time!

STEEL BUILDERS


properly installed shower drain can be the difference between staying dry and disaster. The water flowing down your shower drain requires a proper outlet connection; otherwise, you run the risk of flooding.


With so many different types of drains on offer nowadays (from linear shower drains to grates of all shapes and sizes), there are lessons to be learned about each type before installing one yourself. Whether it’s standard or custom, Steel Builders is here to help you install your shower drain.


SMALL FLOOR WASTES


Small Floor Waste drain products are available in various patterns and sizes to suit a wide range of uses. Welded from 316 stainless steel, these small floor waste drains provide minimal visual impact and a sleek finish that will make your bathroom or shower stand out.


LINEAR SHOWER DRAIN


We’d love to tell you that you can just dig a hole, throw a grate on top and call it a day. But when it comes to installing a linear shower drain and grate, there’s a whole world of possibilities that go beyond functionality. Shower drains can actually add a great deal of value to your bathroom, with a variety of designs and finishes available. Get creative with your shower drains.


CUSTOM SHOWER GRATES


When a standard shower grate installation doesn’t work, you’ll need to consider a custom shower grate and drain modification to suit your application. We offer three top finishes: line patterns, heelguard or tiled inserts.


SHOWER GRATE INSTALLATION STEP BY STEP


  • Start by removing everything to expose the drainage point. Depending on your bathroom and drain size, the drainage point will typically be 50mm, 80mm or 100mm in diameter.


  •  
  • With everything out of the way, install the flange onto the floor, followed by your water stop angles.


  •  
  • Waterproofing. Following Australian Standards, you’ll need to create a slope towards the floor flange. This ensures that any water that penetrates the grout will flow into the drainage point.


  •  
  • With waterproofing complete, it’s time to install the grate. This is where you can start getting creative. Linear shower drain outlets can be installed in the centre, at either end of your shower or at a custom location.


  •  
  • When a standard shower grate doesn’t work, Steel Builders can customise an existing shower grate to length or custom outlet position, which can be welded into place.


  •  
  • Now we have to sand and cement the floor around the shower drain. Remember to leave enough space between the drain to glue your tiles slightly above the drain height.


  •  
  • Fill the joint gap between the shower grate and the tiles with a flexible sealant adhesive to allow for expansion and contraction. Once the sealant has dried, it’s time to enjoy your brand new shower!

  •  

https://www.steelbuilders.com.au/blogs/news/how-to-install-a-shower-drain-steel-builders


How to Install a Shower Drain in a Basement


Hopefully you liked our section on Simple Steps for Installing a Shower Base. Thanks for spending some time to read our blog. Sharing is good. You won't know, you may very well be doing someone a favor. Thanks for your time. Visit us again soon.

Tackling Your Own Drainage System Project

Call Today


They are making several good pointers on the subject of Simple Steps for Installing a Shower Base overall in this great article following next.


Easy Shower Drain Installation Tips
Upgrading a shower room is among the much more prominent home renovation tasks. Taking care of the plumbing for draining your shower can be exceedingly basic unless you overdo it.


Handling Your Own Shower Drainpipe Installment Project


You can physically construct a collection agency for your brand-new shower, however you actually require to think of it. Do you actually want to get into the issues of obtaining the sloping proper, as well as seeing to it every facet of it is water-proof? As well as I imply every aspect! It is much easier to just purchase a pre-cast enthusiast online or at your neighborhood Lowes, Residence Depot or equipment store. Building one may sound like an excellent concept, yet you will possibly feel differently after a couple of hours.

No matter how you deal with obtaining a pan, you ought to make every effort to utilize one that has the drainpipe situated in the exact same spot as the initial frying pan. Moving the drainpipe pipes can be a task, especially if the contractor used a special framing structure. If you are identified to move the drainpipe, you are mosting likely to have to cut back the pipe or lengthen it, which might indicate destroying huge pieces of the flooring. Rephrase, you are mosting likely to be checking out a multiple weekend break job.

Thinking we have our drainpipe aligned, the actual hook up is rather simple. The water drainage pipeline need to be encountering upright up to the enthusiast. It will certainly commonly appear like a "U", which means it functions as a cleanout to keep unpleasant scents from returning up from the drainpipe. To link the drainpipe, you are mosting likely to produce a water limited connection between a drain cap on the top of the frying pan and also the drainage pipeline. Systems vary, however you are commonly going to do this by placing a coupling item on the top of the drainage pipeline. This is then covered with gaskets and also literally screwed right into the drainpipe cap. The drain cap must act as a locknut, to wit, it screws directly onto the combining.

The complicated part of this procedure is obtaining your drainpipe cap to fit into a leak-proof position in the pan. This is completed by withdrawing the drainpipe cap as soon as you make certain everything meshes. At that point, you put plumbings putty around the bottom of the cap and after that screw it back on. The putty ought to develop a limited seal in between the cap and the shower frying pan, which maintains water from dripping under it and right into the mounting under the shower.

Clearly, bathroom showers come in a variety of designs these days. If you acquire a collector, they usually come with plumbing guidelines or the shop can note anything unusual you should recognize. It appears complicated, but is generally quite direct. Enjoy!

Whether you are a tub or shower individual, lots of people try to find shower only options when buying a home. This straightforward truth implies more than a few property owners invest a weekend upgrading or installing showers in their shower rooms. Luckily for you, it is a rather basic procedure.

A collector or pan describes the horizontal surface area located at the end of the shower. The collector typically contains a non-slip surface a little banked in the direction of the center or anywhere the drain is located. Combined with three to 4 inch wall surfaces around the side, the objective of your shower water drainage plumbing is to obtain the water to stream to and down the drain.


Things to Know Before Installing a Shower Drain


Replacing a shower drain isn’t usually a difficult task, but it always pays to be prepared for complications before you start the job, especially as every project is different. While it should take just a couple of hours to replace a drain in a preformed shower base, you’ll want to allow yourself additional time and a flexible toolbox.


“As the age of the shower increases, so does the likelihood of problems during installation,” says Daniel O’Brian, the technical expert for leading online plumbing retailer SupplyHouse.com. Over time, older metal drains can corrode, making them very difficult to remove, and you can even run into problems with installations in newer showers if access to the drain is restricted. No matter what challenges you face, the following tips will help the project go a little more easily.


Prepare for pipe size discrepancies.


The majority of shower drainpipes are two inches in diameter, but if you have two-inch drains and you run into a three-inch drainpipe, you’ll be making another trip to the plumbing supply store. “Always check with local codes,” O’Brian suggests. “The larger drain size minimizes the chance of a shower overflowing.” And if you keep a supply of size-adaptable shower drains on hand, such as the Oatey 2-Inch or 3-Inch PVC Shower Drain, the size discrepancy won’t slow you down at all. This weld-type drain fits either a two- or three-inch drainpipe. With a two-inch drainpipe, the body of the drain fits over the pipe; with a three-inch pipe, it fits inside. If your home has three-inch drainpipes, it pays to pick up a box of size-adaptable drains to have on hand.


Assume you’ll have to cut through the ceiling.


In most cases, you won’t be able to avoid cutting through the ceiling below the shower to gain access. “If a leak is present, you’ll probably have to replace the drywall on the ceiling below as well as the drain, and you should take care of it as soon as possible to minimize damage,” O’Brian says. Drywall replacement is a relatively simple home repair project, so cutting a hole in the ceiling shouldn’t be a major concern. Alternatively, you can cover the hole with a return-air grill that can be easily removed if you need to access the plumbing at a future date.


The only time you won’t need to cut through the ceiling below the shower is when you’re replacing both the drain and the shower base. In that case, start by pulling out the old shower pan and removing the old drain. Then, connect the body of the new drain to the new shower base, and set the shower base in place according to the manufacturer’s specifications. Be warned: Balancing the shower base while you align the drain body over the pipe will almost certainly require the help of an additional person.


The best type of drain for this situation is often called a “compression,” or “friction,” drain, such as this Oatey 2-Inch PVC No-Calk Shower Drain, which features a rubber gasket inside the drain body. Remove the gasket before the shower base is set. After the shower base is set, lubricate the gasket with plumber’s soap and slide it into place between the drain body and the pipe. Tighten the compression nut inside the drain body with a screwdriver to seal the connection, then snap the strainer into place. Being able to remove the gasket before you set the shower base gives you a little more room to maneuver—remember, you’re balancing the shower base while you’re trying to fit the connected drain body over the pipe in the floor.


Tight spots spell trouble.


It doesn’t happen often, but occasionally when you cut through the ceiling below the shower you find wiring or pipes that prevent you from getting your water pump pliers firmly on the nut that connects the drain to the pipe. (These additional wires, pipes, and even ductwork would have been added after the shower was installed.) If you can’t find a way to remove the nut or reach the pipe to cut it below the drain, you may end up having to pull the shower base out so you can access the drain from the top. Then, just like that, what should have been a simple drain replacement turns into a major project.


While you may be stuck with this unanticipated problem, you can prevent it from happening in the future by installing an outer locknut-style drain, such as the Sioux Chief 2-Inch JackRabbit Shower Drain .


Unlike standard drains that solvent weld or attach with a nut, the JackRabbit drain attaches via four jacking screws from below. (It’s usually much easier to get a screwdriver in a tight spot where bulky water pump pliers won’t fit.) The drain body features a push-on compression gasket that attaches to the drainpipe without the need for caulking. After the shower base is set, tighten the jacking screws from below to suck the flange downward until it seals against the shower floor.


Sometimes it’s easier to replace the whole trap.


Whenever you’re installing a shower drain with welded connections, you have to cut the drainpipe to remove the old drain. While this is necessary, it leaves you with a shortened drainpipe that you’ll need to extend before you can install the new drain. Trying to extend the pipe while you’re working overhead in a tight space is both time-consuming and physically challenging, so it’s often quicker (and simpler) just to cut out the entire drain trap and replace it. To install another weld-type drain, such as this 2-Inch Sioux Chief PVC Drain, you’ll want to assemble and dry fit all the connections before you glue them together. Be sure the angle of fall on the horizontal drain pipe remains the standard ¼ inch per linear foot.


Take care not to block weep holes.


Installing a new drain in a tiled shower is another scenario that often necessitates replacing the entire shower floor. Tiled showers rest on a mortar bed laid over a waterproof membrane (such as the Oatey 5’ x 6’ PVC Shower Pan Liner) that’s installed over yet another mortar bed. Because of this construction, a cemented-in shower drain cannot be replaced unless the tiles and the mortar around it are also removed and then reconstructed.


Tiled showers offer another complication: Because grout can crack, it’s important to have a backup plan to catch any water that might leak through. For that reason, shower drains designed for installation in tiled showers should have weep holes in their middle section to direct any water that reaches the membrane into the shower drain. These applications require a drain that has weep holes, such as the Oatey 2-Inch or 3-Inch PVC Shower Drain. To install, attach the base of the three-part drain to the drainpipe before the first mortar bed is smoothed into place. Then, install the membrane over the mortar bed (and over the drain base) and cut out a section over the drain hole in order to attach the center part of the drain, on which the weep holes are located. Make sure the section with the weep holes does not get clogged with mortar. To ensure that water will be able to flow through the weep holes, place several handfuls of pea gravel around the base of the exposed drain to protect it from the next layer of mortar. If you take these precautions, once the shower floor has been tiled, any water that makes its way to the membrane will exit through the weep holes and down the drain rather than leak out elsewhere.

https://blog.supplyhouse.com/5-things-to-know-before-installing-a-shower-drain/


Easy Shower Drain Installation Tips


I am just very taken with Easy Shower Drain Installation Tips and I am hoping you liked my entry. In case you liked our article please don't forget to pass it around. Thanks so much for your time invested reading it.

Preferred Emergency Plumbing Equipment for Your Home

Get Estimate


Here down the page you will discover a lot of great details relating to Five Essential Plumbing Tools Every Household.


Basic Plumbing Tools You Should Have on Hand
House owners need to be furnished for plumbing emergency situations in case of abrupt problems with their plumbing fixtures. It is as a result necessary to have some standard plumbing devices. Using the finest plumbing tools will give you the required results and of course, makes basic Do it yourself plumbing repair work feasible.


Auger:


This is also called a drain serpent and also is made use of for getting rid of drainpipe obstructions. This tool is inserted right into obstructed drains pipes to pull out obstructions and also substances from the drainpipe. You put it in the drainpipe and twist it to break clogs into tinier bits for simple cleansing.


A container wrench:


This is an additional tool that must remain in every home. When doing plumbing repair work, it might be essential to loosen up bolts and sink plumbing fixtures. The basin wrench makes this feasible and is additionally made use of to tighten up nuts. This wrench has a head that rotates at the back as well as front. This assists to get to smaller sized nuts or hold the tap handles as well as pipes.


Pliers:


The type of pliers recommended for plumbing is the tongue-and-groove pliers. Pliers are very important tools for DIY plumbing technicians.


Teflon tape:


This is additionally generally called plumber's tape. It is made use of to securely seal pile joints and suitable. The tapes remain in rolls reduced to certain sizes and also sizes. It is a bulletproof seal and because of this, it can be made use of to hold back leaks till expert help arrives.


Bettor:


Bettor is a very good tool for resolving plumbing problems. It is utilized to clear obstructions in commodes, kitchen sinks, and other drains in your home. There are different kinds of bettors for managing various kinds of drainpipe blockages so you must have different types and dimensions of bettor relying on the one that fits your drains pipes. There are 2 primary kinds of bettor: the cup and the flange. Each of these has its specific applications for cleaning up drain clogs.


Verdict


We ought to not undermine the reality that you may not have all of them or be able to use them for all most likely plumbing concerns that may occur. Obtain a reputable plumbing professional's number now so you can call for help when you require it.
Homeowners require to be equipped for plumbing emergency situations in situation of abrupt problems with their plumbing fixtures. It is as a result necessary to have some fundamental plumbing devices. Using the ideal plumbing tools will provide you the called for results as well as of training course, makes simple DIY plumbing fixings feasible. When doing plumbing repairs, it may be needed to loosen up screws and also sink plumbing components. Bettor is a very good tool for fixing plumbing problems.


FIVE ESSENTIAL PLUMBING TOOLS EVERY HOUSEHOLD SHOULD HAVE


Toilet Auger


The toilet auger is one of the most commonly used items in the plumber’s tool kit. This tool allows people to break up clogs, or retrieve obstructions that are causing blockages. The auger is connected to a flexible shaft which gets pushed down the toilet. A crank handle is also in place at the end, allowing people to grab the obstructions rather than simply breaking them up. The reach on the average toilet auger is around three feet.


Flange Plunger


A flange plunger is not only used by plumbers, but is also a common everyday household item. The flange plunger can come in a large number of different size and shape variations. It is most commonly used to clear clogs in the toilet. The flange plunger works by causing a vacuum, which generates a large amount of water force. The flange plunger differs from a cup shaped plunger because it will shape to seal off the toilet hole.


Plumber’s Snake Or Sink Auger


Sometimes a plunger will not be enough to clear a clog. If a plunger fails, then a plumber’s snake or sink auger should be the next step. These are primarily used for sink waste. The sink auger cable is placed down into the hole of the sink until the clog can be felt. It should then be pulled back slightly and the attached crank should be turned. If this does not clear the blockage then the process should be repeated. If the clog cannot be felt then it is likely to be beyond the distance of the cable and other measures will need to be taken.


Faucet Valve Set Wrench


The faucet valve set wrench is used to remove and replace the faucet body valve seat. When a washer wears down too much it can grind between the washer valve seat and the faucet body valve seat. This can cause the faucet body valve seat to lose its smooth surface and become rough, which can cause leaks. The faucet valve set wrench is used to fix this problem.


Adjustable Pipe Wrench


The adjustable pipe wrench is probably the most recognizable feature of the plumber’s tool kit. This tool is tightened around a pipe using a knurled knob, which is specifically designed to fit rounded objects. The edges of the wrench are serrated, which increases the overall pressure when the wrench is turned. Duck tape should be used as a barrier on the pipe to prevent teeth marks from occurring when using an adjustable pipe wrench.

https://www.horizonservices.com/about-us/blog/five-essential-plumbing-tools-every-household-should-have/


Five Essential Plumbing Tools Every Household


Do you like reading about Emergency plumbing tools? Create a short review directly below. We will be interested to see your feelings about this entry. We hope that you visit us again before long. Are you aware of somebody who is very much interested in the niche? Take a moment to promote it. I truly appreciate reading our article about Emergency plumbing tools.


Don't delay, ring today!

Knowing Kitchen Sink Clogs: Six Potential Factors

Contact Us Now


The content below relating to Easy Ways to Unclog Any Drain in Your Home is definitely compelling. Don't miss it.


Five Ways to Fix a Slow Sink Drain
It's not normal for your cooking area sink to block several times in one month. If your sink blocks twice a week, there's some problem taking place.
An obstructed kitchen area drain does not just reduce your chores, it deteriorates your entire plumbing system, little by little. Right here are some typical routines that encourage sink obstructions, and also how to prevent them.


You require appropriate waste disposal


Recycling waste is excellent, but do you take note of your natural waste also? Your kitchen area should have two separate waste boxes; one for recyclable plastics and also one more for organic waste, which can come to be garden compost.
Having a marked trash bag will certainly assist you and your family members prevent throwing pasta as well as other food residues down the drain. Typically, these remnants take in moisture as well as come to be blockages.


The mistake isn't from your kitchen area sink at all


Perhaps the problem isn't from your kitchen area sink, but the whole drainage system. In such a situation, you may observe that other sinks as well as drains pipes get obstructed every other week. You need an expert plumbing solution to fix this.


You're throwing coffee away


Used coffee premises and coffee beans still take in a substantial amount of wetness. They might seem small adequate to throw down the drain, however as time takes place they begin to swell as well as occupy more area.
Your coffee premises should enter into organic waste disposal. Whatever portion runs away (possibly while you're depleting) will certainly be looked after throughout your monthly cleanup.


You've been consuming a great deal of oily foods


Your kitchen sink may still obtain obstructed even with organic garbage disposal. This might be due to the fact that you have a diet rich in oily foods like cheeseburgers.
This oil layers the insides of pipes, making them narrower as well as more clog-prone.


Make use of a bettor


  • 1. Block the sink's overflow hole with a small cloth.

  • 2. Put your cup-shaped sink bettor-- not a commode bettor, which has a flange for securing a toilet's outlet-- over the sink drain.

  • 3. Fill up the basin with enough water to cover the plunger's cup.

  • 4. Now plunge backwards and forwards in other words, fast activities to compel as much air as feasible down right into the drainpipe.

  • 5. If the clog dislodges, you should see the water in the sink quickly drain away.

  •  

Your pipe wasn't repaired properly in the first place
If you've been doing none of the above, but still obtain routine blockages in your cooking area sink, you ought to call a plumber. There may be a trouble with just how your pipes were mounted.
While your plumber arrives, check for any kind of leaks or abnormalities around your kitchen area pipelines. Do not try to repair the pipes yourself. This might trigger a crash or a kitchen area flooding.


Someone tried to wash their hair in the cooking area sink


There's a correct time and area for whatever. The cooking area sink is just not the appropriate place to wash your hair. Cleaning your hair in the kitchen area sink will certainly make it block sooner or later unless you utilize a drain catcher.
While a drain catcher may capture most of the after effects, some strands may still survive. If you have thick hair, this might be enough to reduce your drain and at some point develop a clog.


There's even more dirt than your pipes can take care of


If you get fruits directly from a ranch, you may notice even more kitchen dust than other individuals that shop from a shopping mall. You can easily repair this by cleaning up the fruits and veggies effectively before bringing them right into the house.You require correct garbage disposal


5 Things to Do if You Want to Unclog Your Kitchen Sink


Trick 1: Don t Put Vegetable Peelings Down Disposal


Although the garbage disposal is a powerful and useful way to get rid of food waste, it is not meant for certain vegetables. Don t put potato, carrot or celery peelings down the disposal. These veggies are fibrous or contain a lot of starch which can jam the disposal motor and clog your sink drain-piping every time. There are other food items that occasionally will clog your sink. If this happens, follow the next four tips.


Trick 2: Use Your Plunger


Plunger is a must-have tool for every household because it can be used to unclog any drain in any part of the house including the kitchen. Yes, the simple plunger can unclog your kitchen sink too. When you use the plunger, plug the other holes in you kitchen sink with a rag cloth. Also, ensure that the plunger cup completely covers the clogged kitchen sink hole. Now, keep the plunger in an upright position and plunge about ten times vigorously. This should remove any vegetable peels, food leftovers or any other solids in the kitchen sink.


Trick 3: Clear the P-trap


The P-trap is the pipe below your sink that s shaped like the letter P (on its side). You should be able to spot it when you look in the cabinet below your sink. This pipe, shaped to provide a seal against sewer odors, gets clogged when receiving larger solid objects. To unclog the P-trap, you need a pair of gloves and a bucket. You should unscrew the large nut on both the sides of the trap with your bare hands and remove the pipe. Make sure you place a bucket right below the trap to collect all the unclogged water. You can also run your hands through the pipe to remove any solid objects.


Trick 4: Use a Metal Wire


Sometimes using a metal wire to push down or pull up debris from your drain can help unclog your kitchen sink. If you don t have a metal wire, unbend a wire hanger and use it in the kitchen drain hole. Since this is time-consuming, you d only use this trick as a last resort. It works well when you know what s inside the drain.


Trick 5: Use a Drain Snake


Go to your local hardware store and buy a short manual-crank drain snake. This tool is fairly inexpensive and works well unless the clog is further down the drain, past the P-trap.


If none of the above tricks work, then you should call an expert right away, especially since clogged drains are the perfect breeding ground for all kinds of bacteria and viruses.

https://www.iveyengineering.com/things-to-do-unclog-kitchen-sink/


Easy Ways to Unclog Any Drain in Your Home


Do you really like reading up on What To Do When Your Kitchen Sink Won t Drain? Try to leave a remark below. We would be glad to see your suggestions about this blog entry. In hopes that you visit us again later on. In case you appreciated our blog posting plz make sure you remember to pass it around. Thanks a lot for your time. Come back soon.


Pro service, one dial away.

1 2 3 4 5 6 7 8 9 10 11 12 13 14 15